FOLLOW THESE INSTRUCTIONS "TO THE LETTER" FOR PROPER ASSEMBLY. FAILURE TO DO SO, MAY RESULT IN SAFETY PROBLEMS AND INJURY. IF IN DOUBT , PLEASE CALL US AND WE WILL BE MORE THAN PLEASED TO ASSIST YOU RIGHT OVER THE PHONE. (1-306-861-6582)
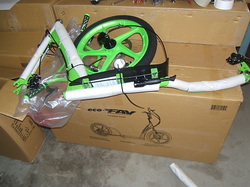
Fig 1
Open box, take out front wheel and spare parts box
* Take out remainder of scooter (Its all attached)
*Lay scooter down flat on its right side on table with front forks on your left and rear wheel bearing facing upwards.(Fig 1)
* Cut ties , take off cardboard, and plastic covering. (Fig 2)
* Take out remainder of scooter (Its all attached)
*Lay scooter down flat on its right side on table with front forks on your left and rear wheel bearing facing upwards.(Fig 1)
* Cut ties , take off cardboard, and plastic covering. (Fig 2)
Fig 2
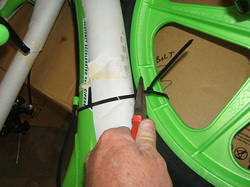
Fig 3
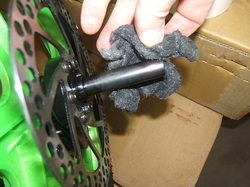
Rear axle may have to be "smoothed" or use fine steel wool just a bit to take a bit of the black paint off. (Makes easier to slide into rear bearing) (Fig 3)
* Insert rear wheel axle into rear bushing all the way (You may have to line up the bushing inside the bearing with your pinky finger) (Fig 4)
* Insert rear wheel axle into rear bushing all the way (You may have to line up the bushing inside the bearing with your pinky finger) (Fig 4)
Fig 4
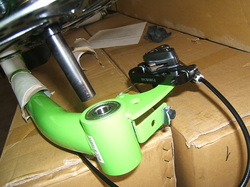
Fig 5
Use larger "LEFT HAND" (Counter clock wise) thread bolt AND WASHER to secure axle to bearing shaft on opposite side where you inserted axle. (Use supplied allen wrench) Hand tighten. (Fig 5)
**** Please note....Instructions with scooter errored and said to turn this axle bolt "clockwise". THAT IS WRONG. This bolt is to be threaded COUNTER CLOCKWISE.
**** Please note....Instructions with scooter errored and said to turn this axle bolt "clockwise". THAT IS WRONG. This bolt is to be threaded COUNTER CLOCKWISE.
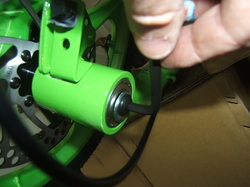
Fig 6
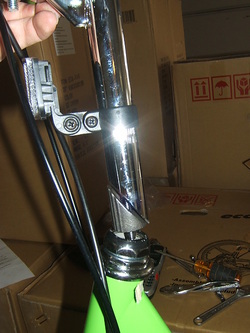
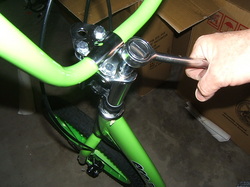
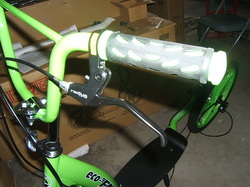
Insert handlebars into shaft up to the mark just under the reflector. Slightly tighten top bolt (13mm) (Fig 6)
( You may have to cut plastic protector on the handlebars to remove it) (See fig 6 B)
( You may have to cut plastic protector on the handlebars to remove it) (See fig 6 B)
Fig 6 B
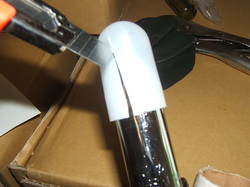
Fig 7
Turn scooter upside down on handlebars and on rear wheel and set in front wheel.
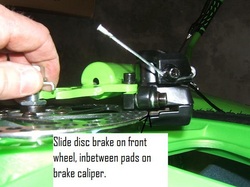
The front wheel BRAKE disc should slide into brake disc pads.(Fig 7 )
The front wheel BRAKE disc should slide into brake disc pads.(Fig 7 )
Fig 7 B
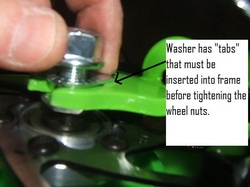
Tighten both wheel nuts snug and make sure "tabs" on washers are into holes on fork.
Fig 8

The brake pads have 2 small bolts that can be loosened to adjust the pad distance from the wheel disc. There will be just a very slight bit of space on each side of the disc and the pads. It takes a bit of adjusting to get the wheel to turn without touching the pads. If they touch a bit , thats ok too.
Tighten the 2 top small bolts on the pad adjuster when no touching is evident. (Fig 8 & 9)
Tighten the 2 top small bolts on the pad adjuster when no touching is evident. (Fig 8 & 9)
Fig 9
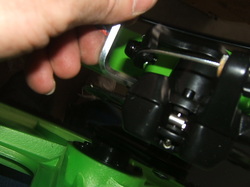
Fig 10
* The rear wheel has the same adjustment , but you must first slide the entire brake pad unit over the rear wheel disc. It should be loose enough to gently push the
brake pad unit down onto the disc.
Take the small bolt from the parts box and insert it into the open bolt hole to tighten the brake unit to the frame. ( Fig 10)
You may have to adjust the brake pads as you did for the front wheel. (Fig's 8 & 9 again)
brake pad unit down onto the disc.
Take the small bolt from the parts box and insert it into the open bolt hole to tighten the brake unit to the frame. ( Fig 10)
You may have to adjust the brake pads as you did for the front wheel. (Fig's 8 & 9 again)
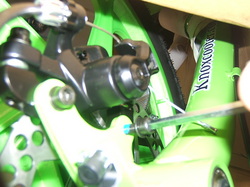
Fig 11
* Turn scooter upright, line up front wheel with handlebars, and tighten top bolt. (Fig 11)
* Tighten the top 4 handlebar bolts to frame clamp .(Fig 12) THIS IS VERY IMPORTANT TO ENSURE THESE BOLTS ARE TIGHT FOR SAFE RIDING.
* Tighten the top 4 handlebar bolts to frame clamp .(Fig 12) THIS IS VERY IMPORTANT TO ENSURE THESE BOLTS ARE TIGHT FOR SAFE RIDING.
Fig 12
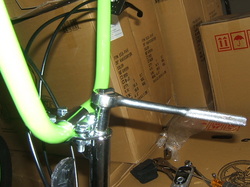
Fig 13
* If needed, loosen the CLUTCH lever with allen wrench and turn it upwards a bit then re-tightened.
Makes it easier to pull at that angle. (Fig 13)
Makes it easier to pull at that angle. (Fig 13)
Fig 14
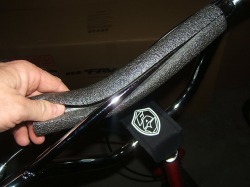
* Place handlebar COVER AND VELCRO cover & bolt covers on as illustrated .(Fig 14)
* Make sure all cables are NOT tangled and handlebars move freely from full left to right. (Fig 15)
* Make sure all cables are NOT tangled and handlebars move freely from full left to right. (Fig 15)
Fig 15

Fig 16
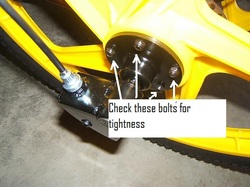
*** Double check all bolts for tightness especially the 5 clutch bolts on rear wheel (Fig 16) ****
* Test brake and clutch operation BEFORE RIDING ! Clutch may be a bit stiff for awhile , but will loosen up with time
Fill tires to 35 lbs.Wear a helmet, ride in safe uncluttered areas.
Ride only on smooth surfaces.
HAVE FUN
* Test brake and clutch operation BEFORE RIDING ! Clutch may be a bit stiff for awhile , but will loosen up with time
Fill tires to 35 lbs.Wear a helmet, ride in safe uncluttered areas.
Ride only on smooth surfaces.
HAVE FUN
